Lab 2: Open Loop Control
Overview
In this lab, we are going to learn how to write a Python script to control the robot. You will be exposed to basic ROS concepts, including ROS Node, ROS Topic and ROS Publisher. Tutorials and supplementary reading materials will be provided.
Specifically, the task is to make the robot move in a square shape using open-loop control (i.e. sending commands only; no feedback). The waypoints to visit are [4, 0], [4, 4], [0, 4] and [0, 0]. In other words, the robot should move forward 4 meters, turn left 90 degrees, move forward again 4 meters, and so on, until going back to the origin. Note that the robot is supposed to stop at the origin after completing this square movement, and the Python script should exit gracefully.
Preview: Next week we will learn how to use closed-loop control to track a trajectory.
Submission
Submission: individual submission via Gradescope. Only if you are using an M1/M2 Mac computer, please send us the files on our email by having a title “EE144 - Lab1 Files - Your Name” so we can test them, including also a video of the robot behavior. Capture a panoramic video of the robot demonstrating the followed trajectory inside the Gazebo world. You can use the simplescreenrecorder software, by installing it with,
sudo apt install simplescreenrecorder
Demo: required during the lab session (will use autograder; see below)
Due time: 5:00pm, Oct 27, Friday
Files to submit: (please use exactly the same filename; case sensitive)
lab2_report.pdf
open_loop.py
Grading rubric:
+ 50% Clearly describe your approach and explain your code in the lab report.
+ 40% The robot can visit all four vertices of the square trajectory (error < 1.0m). Partial credits will be given according to the number of vertices visited.
+ 10% The script can complete the task on time and exit gracefully.
- 15% Penalty applies for each late day.
Autograder
All code submissions will be graded automatically by an autograder uploaded to Gradescope. Your scripts will be tested on a Ubuntu cloud server using a similar ROS + Gazebo environment. The grading results will be available in a couple of minutes after submission.
The autograder works in the following way (no action on your side needed; just to explain). (1) Under Gazebo simulation environment, the submitted Python script will be run for once and the robot trajectory will be saved into csv files. (2) The scores will be given by evaluating the saved trajectory and uploaded back to Gradescope.
Testing parameters are as follows.
The tolerance for distance error is set to 1.0m (considering this is open-loop control).
For example, passing point [3.6, 3.4] is approximately equivalent to passing point [4.0, 4.0].
The time limit for the submitted script is set to 5 mins.
If running properly, the task in this lab can be done in about 1 min, based on our testing.
If running timeout, the script will be terminated and a 10% penalty will apply.
Therefore, it is important that your script can exit gracefully after task completion. (Just avoid using infinite loops and/or remember to add a break condition.)
The global time limit on Gradescope server is set to 10 mins.
If running timeout, the entire grading process will be terminated and you will have no grading results.
This can happen if you have dead loop in the script (e.g.,
while True: xxx) and the autograder is not able to terminate the script. (Scripts like this cannot be terminated byCtrl + Cin terminals, if you test it yourself.)
Introduction to Turtlebot
The Turtlebot 2 robot is a differential wheeled robot built on top of the Kobuki mobile base. We have customized it to include more sensors (one Lidar, two cameras, and one manipulator). See the image (left) below for Turtlebot family.
Though multiple layers of plates/sensors are placed on top of the robot, the kinematics of the robot can be simplified according to the property of its mobile base, which uses differential drive for locomotion. The differential mobile base has two powered wheels, located symmetrically about its center.
As users, we can send high-level commands (linear velocity v and angular velocity ω)
to the robot. The mobile base will first transform the v and w commands with respect to the
robot center into the desired rotational speed of each wheel, and then control the rotational
speed by a feedback control of the current of the motor that drives the wheel.

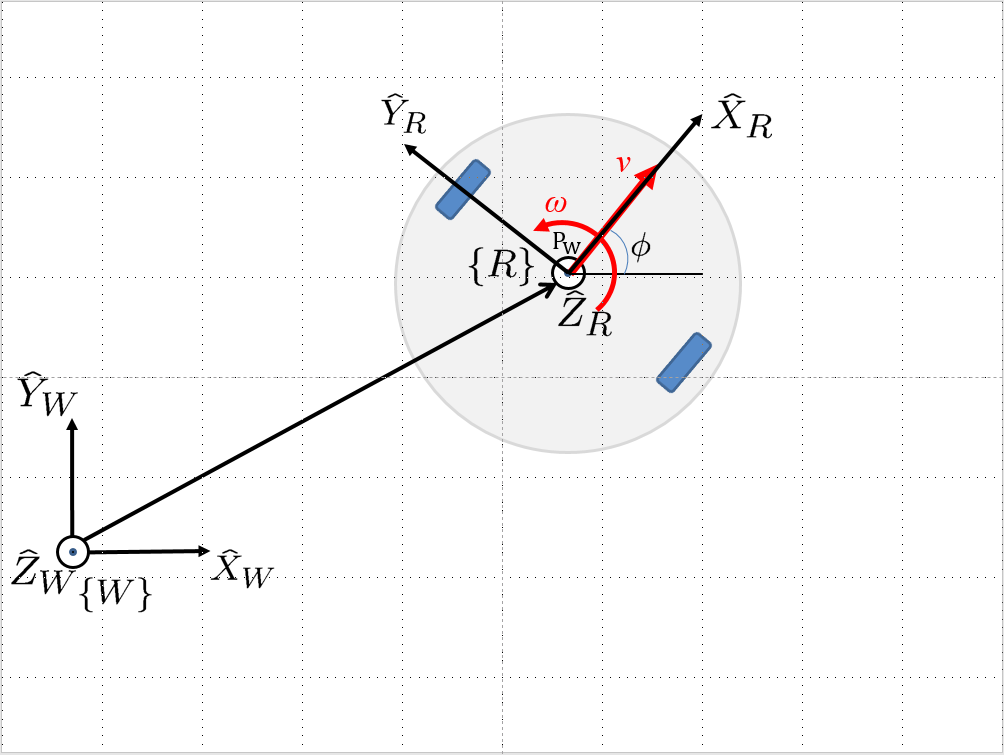
To describe the position and orientation of the robot,
we attach a robot coordinate frame \(R\) to it.
The origin of this coordinate frame is centered between its powered wheels.
The X axis of this frame is pointing forward (along the direction of the linear velocity v),
the Y axis is pointing to the left, and the Z axis is pointing up.
To track the position and orientation of the robot, we generally define a world reference frame \(W\), in the same plane where the robot moves. With this frame assignment, the robot’s position is constrained to the X − Y plane of frame \(W\). Moreover, any rotation between the robot and the world frames can be expressed as a rotation about Z axis. Therefore, the position of the robot with respect to the world reference frame will have the form:
while the rotation matrix expressing the orientation of the robot frame with respect to \(W\) will be of the from:
Programming Tips
We follow ROS conventions to use SI units. (i.e. length in meter, time in second, angle in radian). See ROS Wiki article REP 103 Standard Units of Measure and Coordinate Conventions for more information.
When a new robot is spawned, the forward heading direction is the positive x axis; the leftward direction is the positive y axis; and by right-hand rule, z axis upward. This is also specified in REP 103.
Python is an indent-sensitive programming language, as opposed to C/C++.
You can use either
spaceorTabfor indent, but please do not mix them in one file. Otherwise you will see lingering syntax errors. (IMO,spaceis recommended.)A better way to organize indent is to use an Integrated Development Environment (IDE) for programming, where
Tabkey can be automatically converted into 2 or 4 ``space``s.
The recommended IDE in Linux is VS Code. Just go to the official website, download
.debfile and install it.After installation, you can go to Extensions and search for ROS. Adding this extension can help you highlight the code and bring more convenience.
In Gazebo, you can use
Ctrl + Rto set the robot back to the origin without the need to relaunch.In this lab, you need to finely tune the parameters for open-loop control.
Please note that parameters may vary from platform to platform. In other words, the parameters work in your VM may not necessarily work in the cloud server running autograder.
In Gazebo, you can take the visualization as feedback (the grid size of the ground is 1 meter) to tune the parameters.
On Gradescope autograder, you can take the evaluation results (visited waypoints) as feedback to make minor adjustments to the parameters you have already tuned in the VM.
Sample Code
A sample code is provided to make the robot move forward for a certain distance.
Please read carefully the provided code, and understand its functionality.
You need to make changes under run function to complete the square trajectory.
(Hint: honestly, this lab can be done in 10 lines of code if you know what you are doing.)
Open a new terminal and go to your
ee144f23package. We will start from a new Python script.roscd ee144f23 mkdir scripts cd scripts touch open_loop.py gedit open_loop.py
Please copy and paste the following code, then save and close it. If you are using M1/M2, please replace the first line of the code with python3 and the ROS Topic with “cmd_vel”.
#!/usr/bin/env python

import rospy
from geometry_msgs.msg import Twist
from math import pi

class Turtlebot():
    def __init__(self):
        rospy.init_node("turtlebot_move")
        rospy.loginfo("Press Ctrl + C to terminate")
        self.vel_pub = rospy.Publisher("cmd_vel_mux/input/navi", Twist, queue_size=10)
        self.rate = rospy.Rate(10)
        self.run()


    def run(self):
        vel = Twist()
        vel.linear.x = 0.5
        vel.angular.z = 0
        #while not rospy.is_shutdown():  # uncomment to use while loop
        for i in range(50):
            self.vel_pub.publish(vel)
            self.rate.sleep()
        """
        vel.linear.x = 0
        vel.angular.z = 0.05
        #while not rospy.is_shutdown():  # uncomment to use while loop
        for i in range(50):
            self.vel_pub.publish(vel)
            self.rate.sleep()
        """

if __name__ == '__main__':
    try:
        whatever = Turtlebot()
    except rospy.ROSInterruptException:
        rospy.loginfo("Action terminated.")
Note
Recall in Lab 1 that you need to first launch your Turtlebot robot in Gazebo on a terminal before sending any commands to it.
roslaunch ee144f23 gazebo.launch
Back to the terminal, you can run it in two ways. One is to feed this script as input to the Python program in Linux, as shown below.
python open_loop.pyThe other way is to run it as a regular executable in Linux. In this case, you need to first grant the execution permission to this Python script. This step only needs to be run once.
chmod +x open_loop.py
Now you can see that this file is in green color when you
lsthe current directory in the terminal. This is how Linux terminal distinguishes executable (in green or highlight) and non-executable (in white).ls
Then you can run it by command
./open_loop.py
Sample Code Explained
Now, let’s break the code down.
The first line makes sure your script is executed as a Python script in Linux. You need this line if you want to run it as a regular executable (i.e. run by
./filename.py) in Linux.#!/usr/bin/env pythonYou need to import rospy in order to use ROS in Python. This is the Python library that contains common operations and resources in ROS.
import rospy
This line imports a
Twistclass that can carry linear and angular velocity information. Later on we will need to create an instance of this class, assign the velocity value, and publish it out to the robot.from geometry_msgs.msg import Twist
We import a high-precision value of pi (in radian) from math library. Print it out and see its value :) This is for your convenience to add the turning part of the code.
from math import pi
We use class to better organize resources (variables and functions) in Python scripts. With class, we can easily update the value of a variable in one function and have access to it from another member function.
In the following code structure, we first define a class named
Turtlebot, and then create an instance (object) calledwhateverin the Python main function. The Python program will start running from the line right afterif __name__ == '__main__':. However, to create a new instance, the program needs to run__init__function for once (this is a function that every class must have for the initialization process). We then callrunfunction under__init__function. As such, each component is connected into the running pipeline.The keyword
selfis a pointer used internally to refer to resources, and the keywordpassis just a placeholder that actually does nothing.class Turtlebot(): def __init__(self): self.run() def run(self): pass if __name__ == '__main__': whatever = Turtlebot()
The
try-exceptblock is used to handle exceptions. In this case, it will provide logging information when the user terminates the program usingCtrl + C. For the time being, we do not need to know more details on this.if __name__ == '__main__': try: whatever = Turtlebot() except rospy.ROSInterruptException: rospy.loginfo("Action terminated.")
In ROS, we have a ROS Master (or
roscore) running as a central server to manage global resources and connect all ROS Nodes. Each program will need to talk to this central server first before talking to other program (this process is, in other words, to register itself as a ROS Node). Therefore, in each and every Python script running ROS, the first thing to do is to initialize itself as a ROS Node. The argumentturtlebot_moveis the name we would like to assign to this ROS Node.rospy.init_node("turtlebot_move")
What follows is a common logging function used in ROS. In addition to printing the message to screen (as what
printfunction does in Python), it can also save the log in ROS central server for further debugging purpose.rospy.loginfo("Press Ctrl + C to terminate")
ROS Topic is a way that ROS Node communicates with each other for continuous data transmission. (In this case, we keep sending velocity commands.) For one-time short communication, we also have ROS Service, which will not be covered in this course.
On the robot side, there is a ROS Subscriber waiting for velocity commands. What we need to do in this script is to create a ROS Publisher to send commands. The required arguments are the topic name
cmd_vel_mux/input/navi, the message typeTwist, and the queue size10.self.vel_pub = rospy.Publisher("cmd_vel_mux/input/navi", Twist, queue_size=10)
The following question is how frequently we should send velocity commands. Note that the robot will stop if no velocity command is received after a while, and the robot may “panic” if thousands of commands are received in a second. Therefore, we can pick a moderate rate at 10Hz (i.e. 10 commands per second).
We use the
Rateclass to help us manage the timing. By using therate.sleep()function together withwhileorforloop, we can approximately keep the loop running at 10Hz rate. Therate.sleep()function can calculate how much time elapsed since last time it was called. If this time elapsed is less than 1/rate (in this case 0.1s), it will block the program till the time has reached 1/rate. If the time has already exceeded 1/rate, it will simply let it go.self.rate = rospy.Rate(10) for i in range(50): self.vel_pub.publish(vel) self.rate.sleep()
To prepare a ROS Message that contains velocity data, we first create an instance (called
vel) of theTwistclass (which is the message we are about to send), and then assign linear and angular velocity to its corresponding variable. Note that you need to use.to have access to the member variables of a class data structure. See ROS Wiki documentation for more information about the message definition.vel = Twist() vel.linear.x = 0.5 vel.angular.z = 0 self.vel_pub.publish(vel)
Lastly, if you use
whileloop, it is highly recommended to add a condition to check if the ROS server is still alive. This can help terminate the Python script whenever you pressCtrl + Cin the terminal. On the contrary, dead loop likewhile True: xxxwill not respond to your shutdown commands (unless you add properbreakcondition in the loop).while not rospy.is_shutdown(): pass